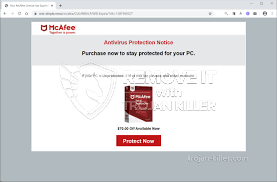
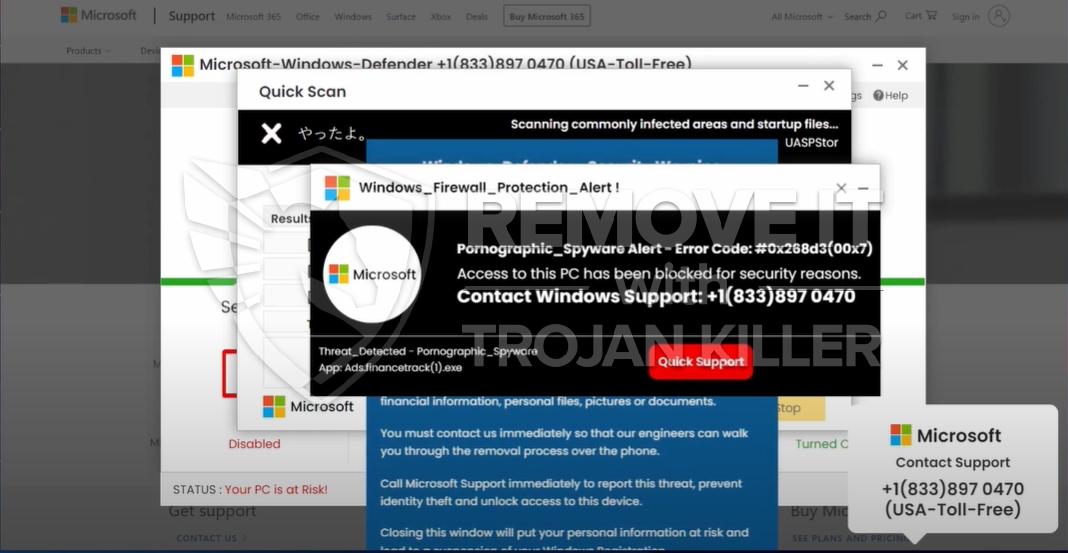
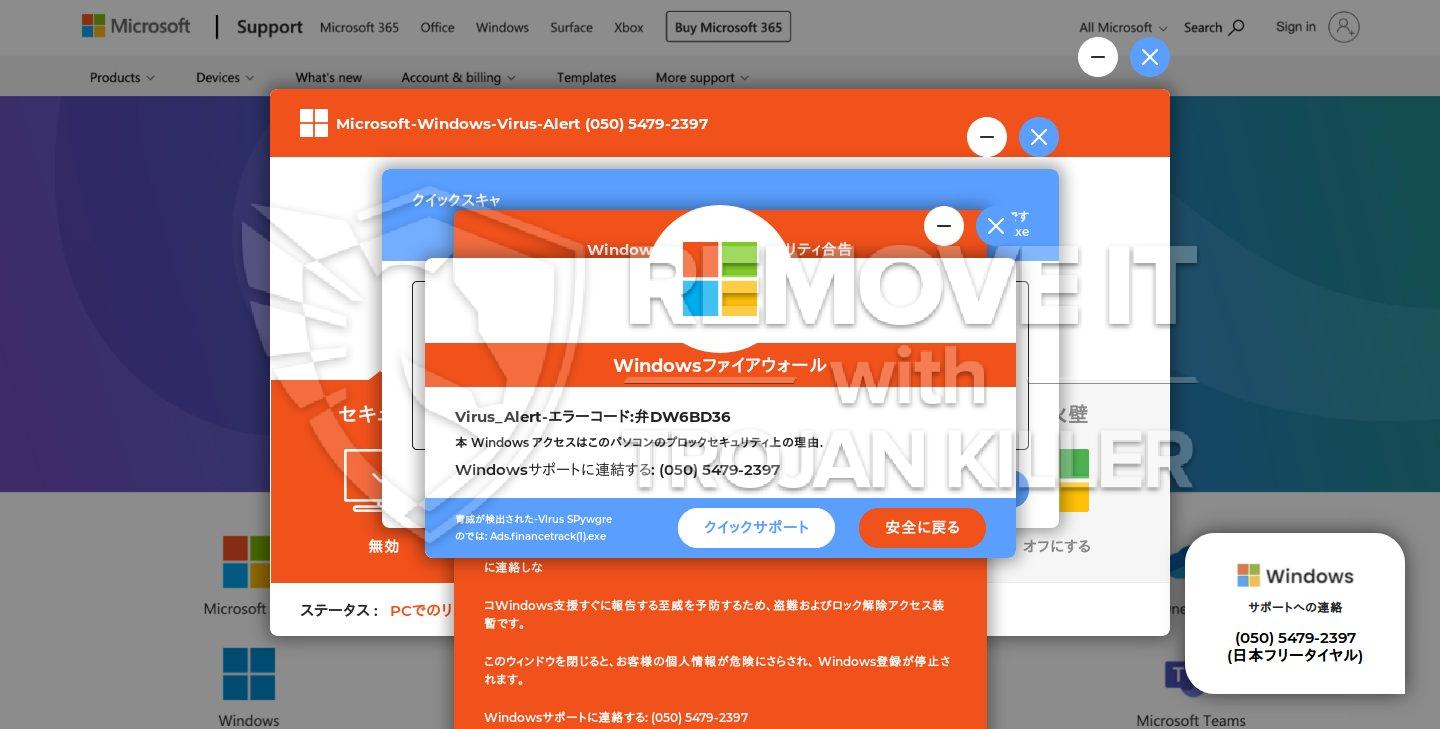
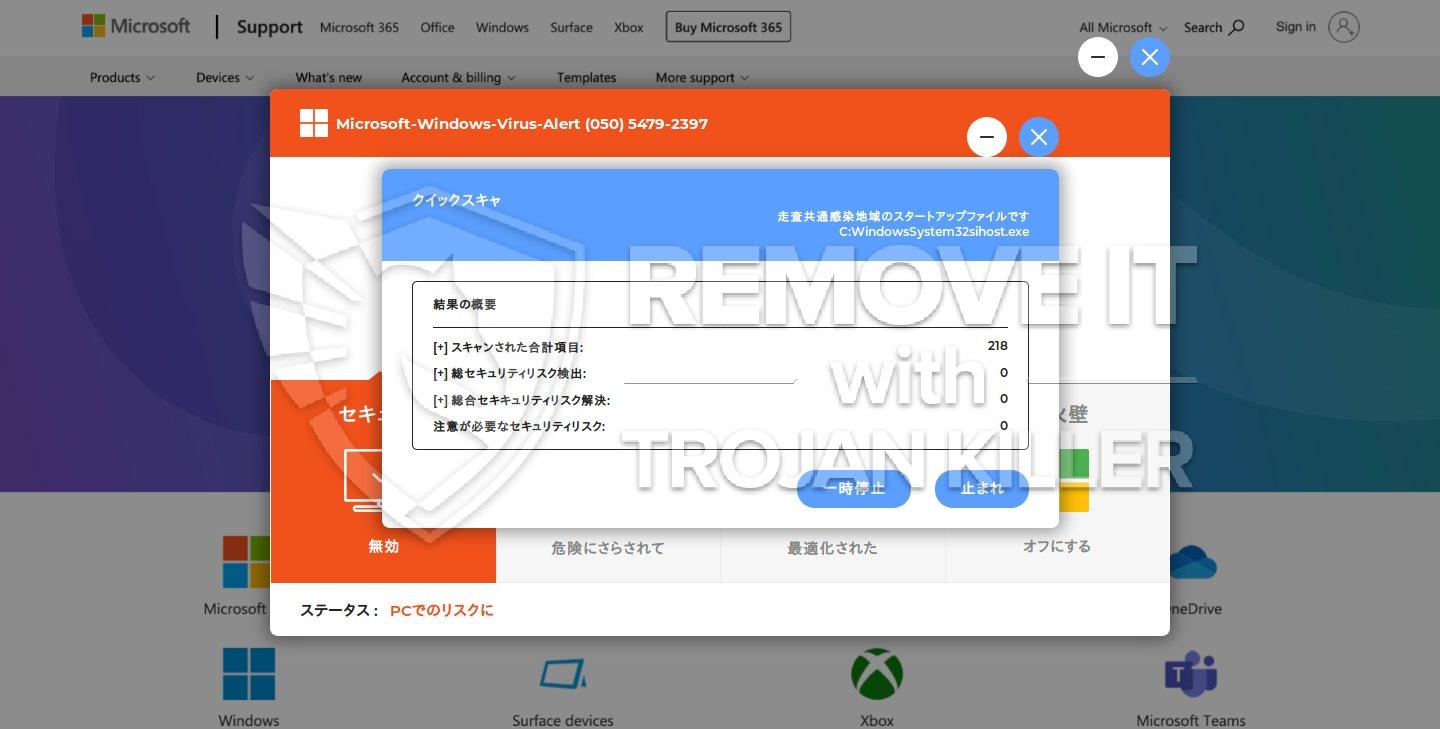
Your Windows is infected with (2) Viruses! pop-ups in your browser alert about problems with the system. It is a browser hijacker that controls generating of such notifications and shows them in your browser. It forwards you to teccame.com site without your direct intention and tries to persuade in the necessity to install some useful apps because you have problems with your computer. As a rule, there are users who really believe in these tips and install the offered utilities, they can also call on the phone number given in the notification or go to a third-party website as ‘Your Windows is infected with (2) Viruses!‘ asked.
 Your Windows is infected with (2) Viruses!
Google Chrome, Mozilla Firefox, Internet Explorer are often attacked by ‘Your Windows is infected with (2) Viruses!’ common malware that injects motivating messages, system error alerts and other types of notifications concerning further interaction. Internet visitors need to do the screening with the help of utility specially made for this type of threat as soon as possible. By the way, such teccame.com pop-ups are localized depending on the language used in targeted PCs. For example, these are quotations from scary alerts in various languages:
Teccame.com pop-ups attacking Denmark:
ADVARSEL
Windows er inficeret med virus og andre ondsindede programmer. Virusser skal fjernes og system skader repareres.
Det er n?dvendigt at k?re Virus fjernelse proceduren straks, forts?t. Hvis du forlader denne hjemmeside vil din Windows forblive beskadiget og s?rbar
Teccame.com pop-ups attacking the UK:
Your Windows is infected with (2) Viruses. The pre-scan found traces of (2) malware and (1) phishing/spyware. System damage: 28.1% – Immediate removal required!
The removal of (2) Viruses is required immediately to prevent further system damage, loss of Apps, Photos or other files.
Traces of (1) Phishing/Spyware were found on your computer. Personal and banking information are at risk.
Teccame.com pop-ups attacking Germany:
WARNUNG!
Windows ist mit Viren und anderen sch?dlichen Anwendungen infiziert. Viren m?ssen entfernt und System sch?den repariert werden.
Es ist notwendig, die Virusentfernung sofort durchzuf?hren, bitte fahren Sie vor.
**Wenn Sie diese Seite verlassen, bleibt Ihr Windows besch?digt und verwundbar**
Teccame.com pop-ups attacking France:
ATTENTION!
Windows est infect? par des virus et d’autres applications malveillantes. Les virus doivent ?tre enlev?s et les dommages au syst?me doivent ?tre r?par?s.
Il est n?cessaire d’ex?cuter la proc?dure de suppression de virus imm?diatement, veuillez proc?der.
**Si vous quittez ce site, votre Windows restera endommag? et vuln?rable**
Teccame.com pop-ups attacking Spain:
?ATENCI?N!
Windows est? infectado con Virus y otras aplicaciones da?inas. Los Virus deben ser eliminados y el da?o al sistema reparado.
Es necesario ejecutar el proceso de eliminaci?n de Virus inmediatamente, por favor continue.
**Si abandonas este sitio tu Windows permanecer? da?ado y vulnerable**
Teccame.com pop-ups attacking Norway:
ADVARSEL!
Windows er infisert av virus og andre skadelige programmer. Virus m? fjernes og systemskade reparert.
Det er n?dvendig ? kj?re prosedyre for ? fjerne virus umiddelbart, vennligst fortsett.
**Hvis du forlater denne siden vil din Windows forbli skadet og s?rbar**
Teccame.com pop-ups attacking Finland:
VAROITUS!
Windows on saastunut viruksista ja muista haittaohjelmista. Virukset tulee poistaa ja j?rjestelm?vahingot tulee korjata.
Viruksenpoistoprosessi tulee suorittaa v?litt?m?sti, ole hyv? ja jatka.
**Jos poistut sivulta, Windows-laitteesi pysyy vahingoittuneena ja suojaamattomana**
Your Windows is infected with (2) Viruses! marked as teccame.com are able to disappear after scanning the system with a special utility designed for cleaning PC. Pay closer attention to the installation process which hackers use to infect the system with adware and hijackers. Opening spam email plays not the last role in the penetration of the system. Use an anti-malware scanner on the regular basis, it will help to avoiding privacy lose and take care of the rubbish that managed to occur in the system.
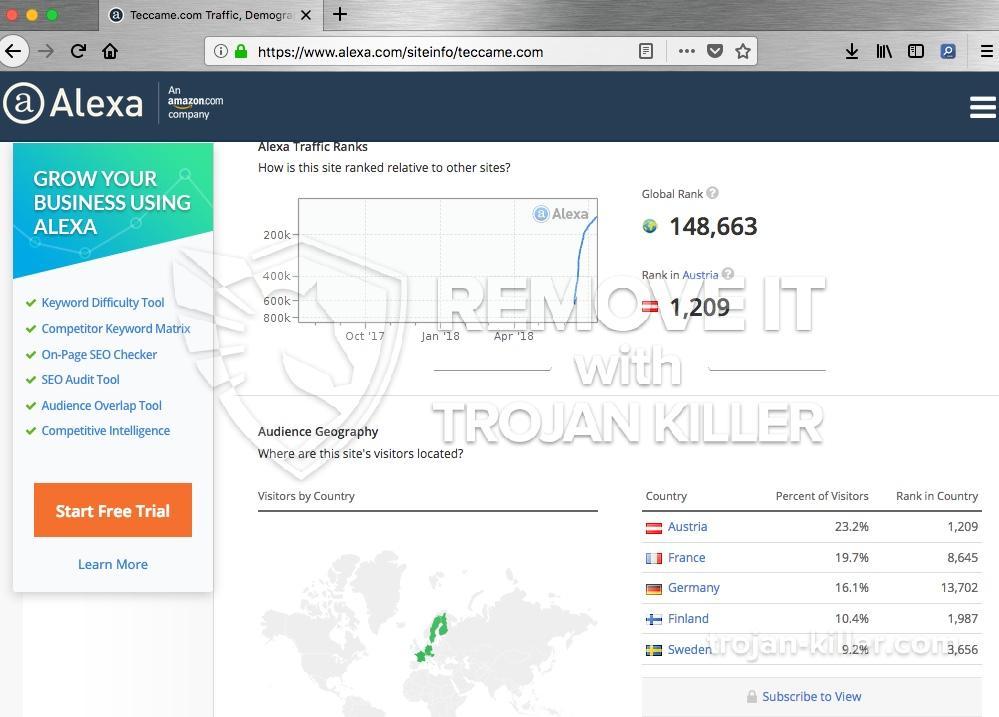 Your Windows is infected with (2) Viruses!
Your Windows is infected with (2) Viruses! malware is what appears in result of wrong online action and careless attitude to own applications, use GridinSoft Anti-Malware software to detect and delete common malware programs and save the privacy. Clear guidance you see below the text will help you to do everything fast.
Usually antivirus software is intended to remove viruses, rootkits and other infection in your system. But they are oftenly ineffective when you are bombed with a huge amount of advertisment and pop-ups, and malicious software? When standard anti-virus software either fails to detect them or fails to effectively eliminate them Antimalware Software will be effective in this field. We are good in doing this and we are proud of our mission to let you breathe freely surfing the Internet!
GridinSoft Anti-Malware is designed specifically to disable/remove Malware without the user having to manually edit system files or the Registry. The program also removes the additional system modifications some malware carries out which are ignored by most antivirus scanners.
BESIDES, it is easy to choose a good antimalware solution according your needs using our mini-guide.
Follow the steps in the slider explaining how to use GridinSoft Anti-Malware.
- Step 1. Download GridinSoft Anti-Malware. Click on its installer in the left-bottom section of your browser.
- Step 2. Allow changes to be made via User Account Control.
- Step 3. Click on “Install” to install the program.
- Step 4. Wait until the program is fully installed into your PC.
- Step 5. Click on “Finish“.
- Step 6. Run the program. Wait until scanning is completed and all malware is detected.
- Step 7. Click on “Clean Now“.
- Step 8. Select the license type and purchase the program. Remove all identified threats with purchased version of the software.
- Step 9. Shut down all your browsers. In GridinSoft Anti-Malware, click on “Tools“, then select “Reset browsers settings” option.
- Step 10. Select browsers you want to be automatically reset and appropriate reset options, then click on “Reset“.
- Step 11. Click on “Protect“. Make sure that Internet Security mode is enabled.
Tips to remove Your Windows is infected with (2) Viruses! manually from your PC.
STEP 1. Uninstalling unwanted software regularly (via the Control Panel).
In order to get rid of Your Windows is infected with (2) Viruses! from your system, locate the “Uninstall a program” feature in your PC depending on the version of your Windows operating system:
- For Windows 8/10: Right-click on Start – Quick Access Menu – Control Panel – Uninstall a program. You may check the list of applications and utilities installed on your PC. Find suspicious software that may cause Your Windows is infected with (2) Viruses! problem, then right-click on it and select “Uninstall“.
- For Windows 7: Click on Start – Control Panel – Uninstall a program. Check the list of programs and software available in your PC that might cause Your Windows is infected with (2) Viruses! problem, then press “Uninstall“.
- For Windows XP: Click on Start – Control Panel – Add/Remove Programs. You will find the list of available programs in your PC. Right-click on suspicious software that may cause Your Windows is infected with (2) Viruses! problem and select “Uninstall“.
Here is the detailed process with screenshots on how to uninstall unwanted software manually.
- Right-click on Windows logo in the bottom-left section of the screen, then select “Control Panel“:
- In “Programs” section, click on “Uninstall a program“:
- Right-click on specific unwanted application, the select “Uninstall“:
- Right-click on Windows taskbar, then select “Task Manager“:
- Select specific task related to unwanted program, then right-click on it and choose the option “End Task“:
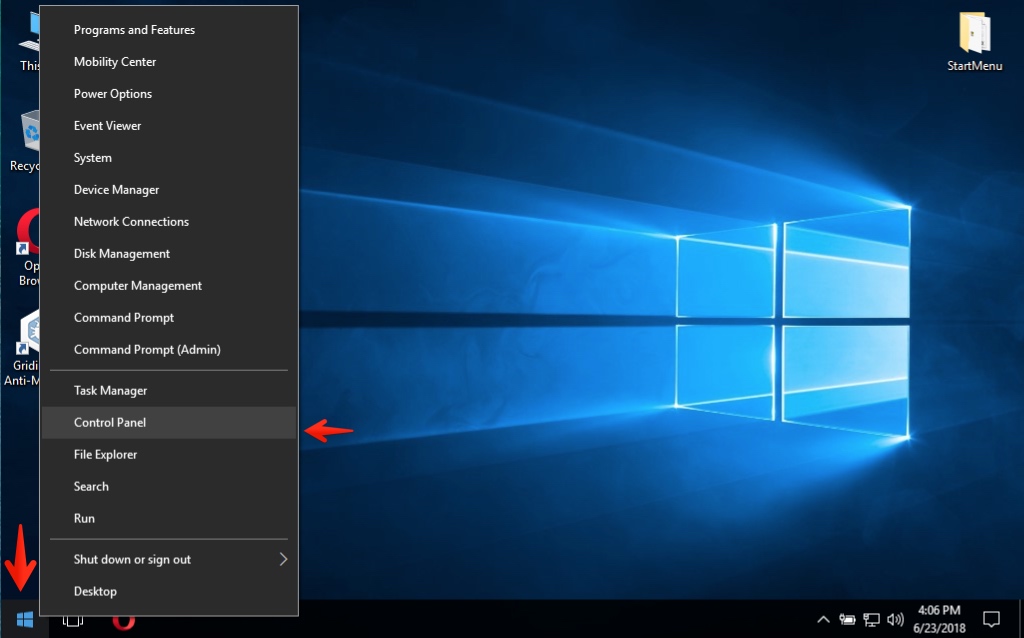 How to start Control Panel in Windows
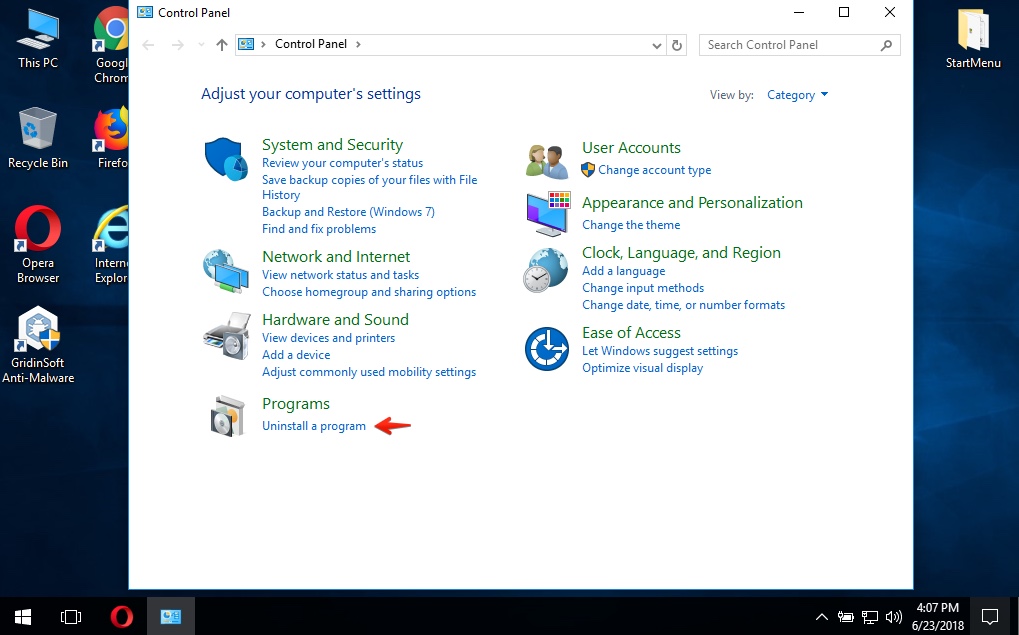 Control Panel – Uninstall a program
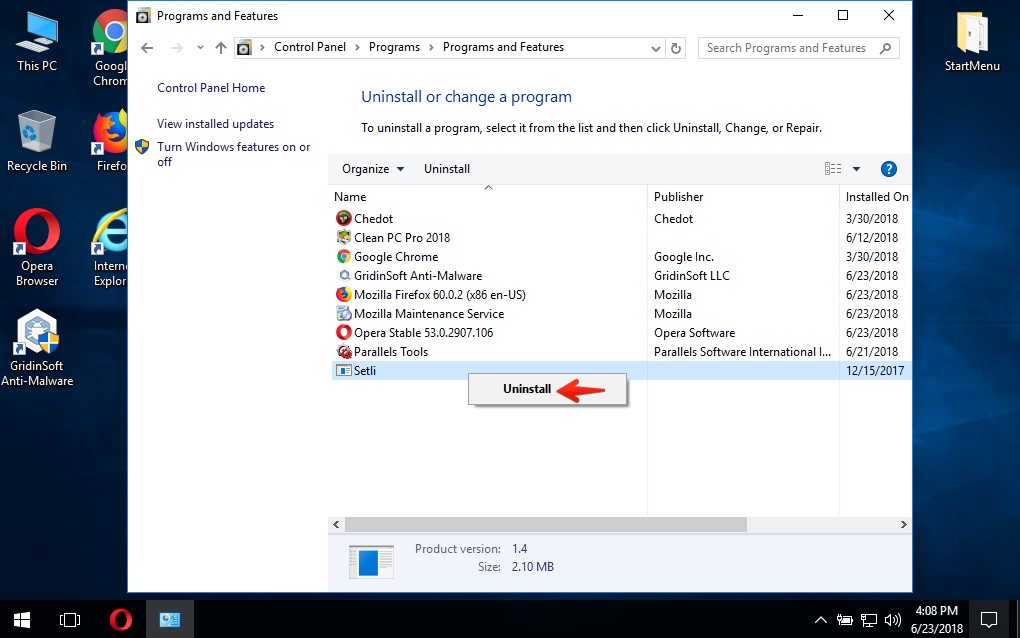 How to uninstall a program in Windows
Warning! Some unwanted programs may be active (running) while you attempt to uninstall them. It might be necessary for you to end their task via the Task Manager application. Here is how you can do that:
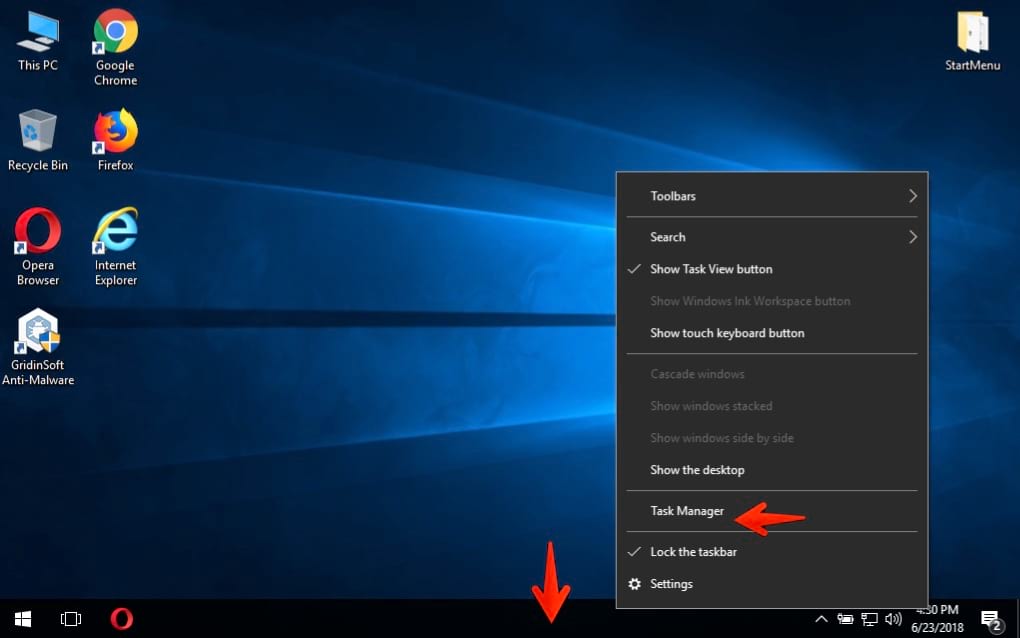 How to launch Task Manager
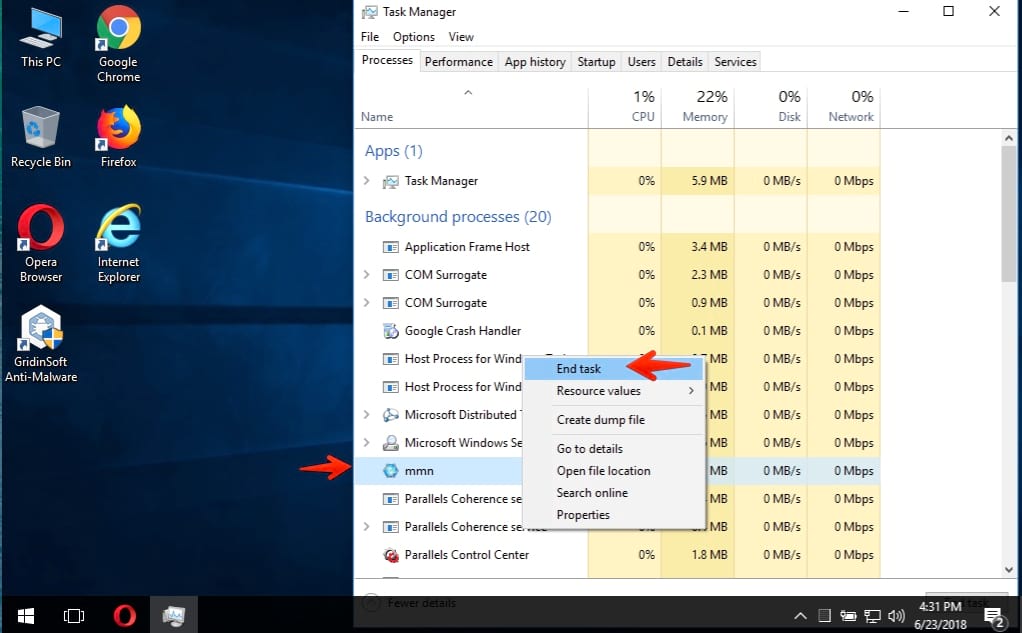 How to end task of specific program in Windows
Warning! Manual malware removal as described above is often a very time-consuming undertaking. It requires a lot of technical skills and does not guarantee absolute repair of your system. We recommend you to select our fully automatic solution to fix your PC on a professional basis.
STEP 2. Fixing your browser home page and search engine settings.
Instructions to fix Google Chrome home page and search engine settings manually.
- Click on Google Chrome menu in the form of three vertical dots, then select “Settings“:
- Scroll down through Google Chrome Settings until you reach “On Startup” section. Select “Open a specific page or set pages“. Find suspicious unwanted home page, then clock on “Remove“:
- In Google Chrome Settings find “Search Engine” section. Select your preferred search engine to be enabled if your search settings are messed up (amended) by adware or browser hijacker:
- Click on “Manage search engines“.
- Find specific search engine that you do not want to be your default one, then click on “Remove from list“:
 Google Chrome Settings
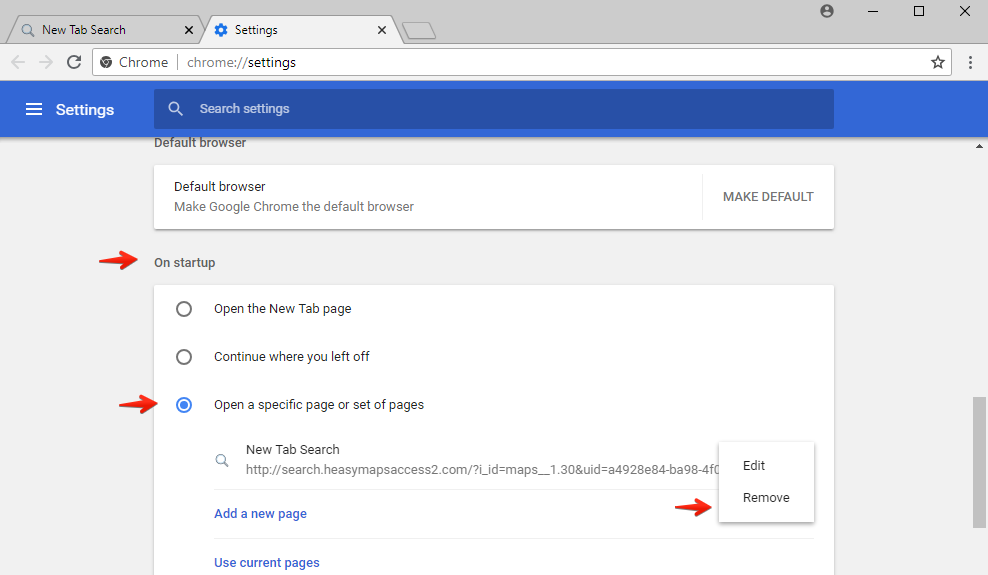 Google Chrome – Set Pages
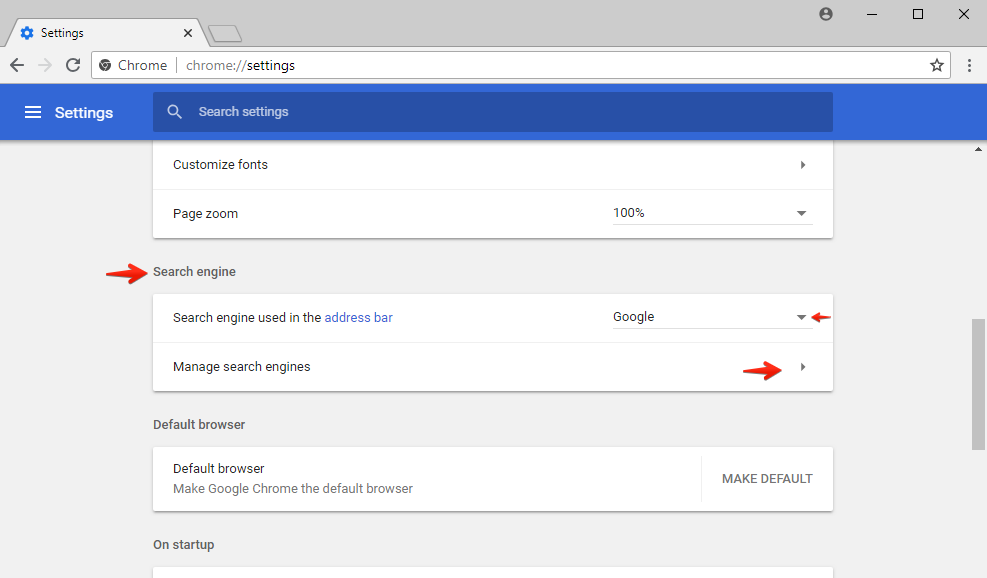 Google Chrome Search Engine parameters
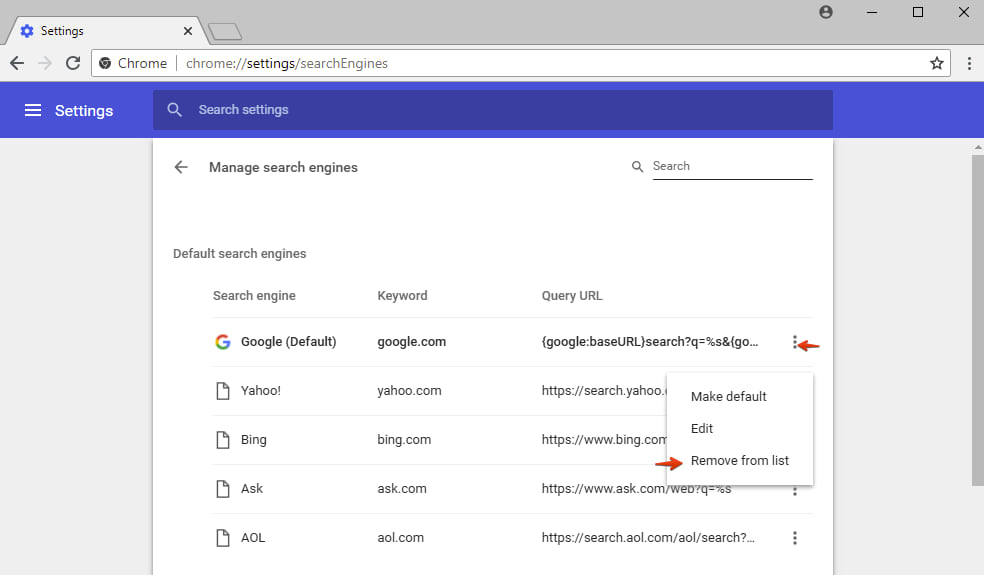 Removing unwanted search engine from Google Chrome list
Instructions to restore Mozilla Firefox home page and search engine settings manually.
- In Mozilla Firefox, click on its menu in the form of three horizontal lines, then select “Options“:
- In “General” section, check home page settings. Remove unwanted parameters, or click on “Restore to Default“:
- In the “Search” section of Mozilla Firefox, select your preferred search engine:
- You may as well remove unwanted search engine completely from Mozilla Firefox by clicking on the “Remove” button next to it:
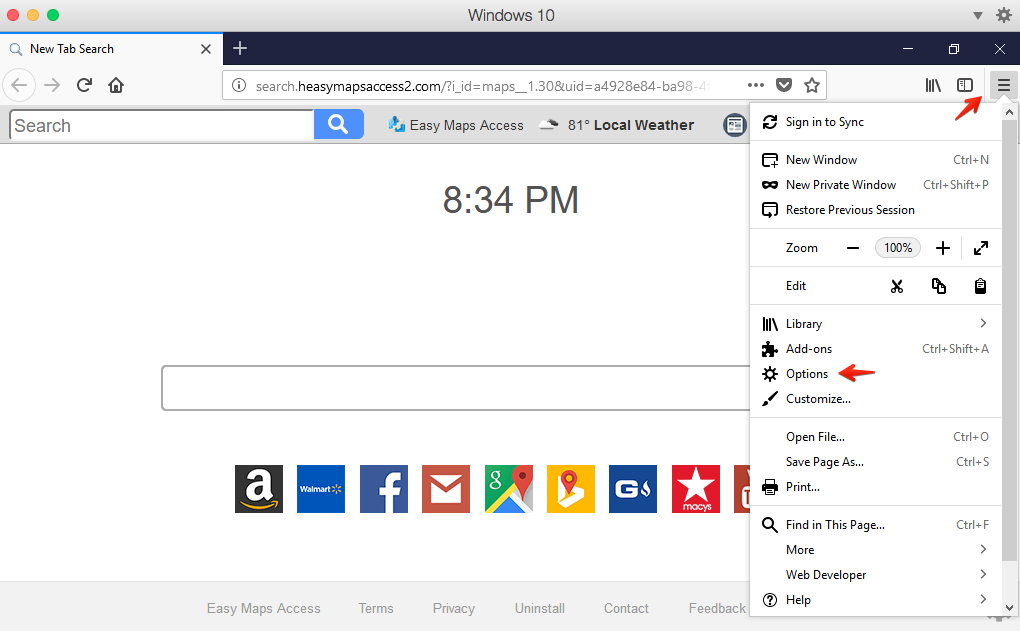 Mozilla Firefox options
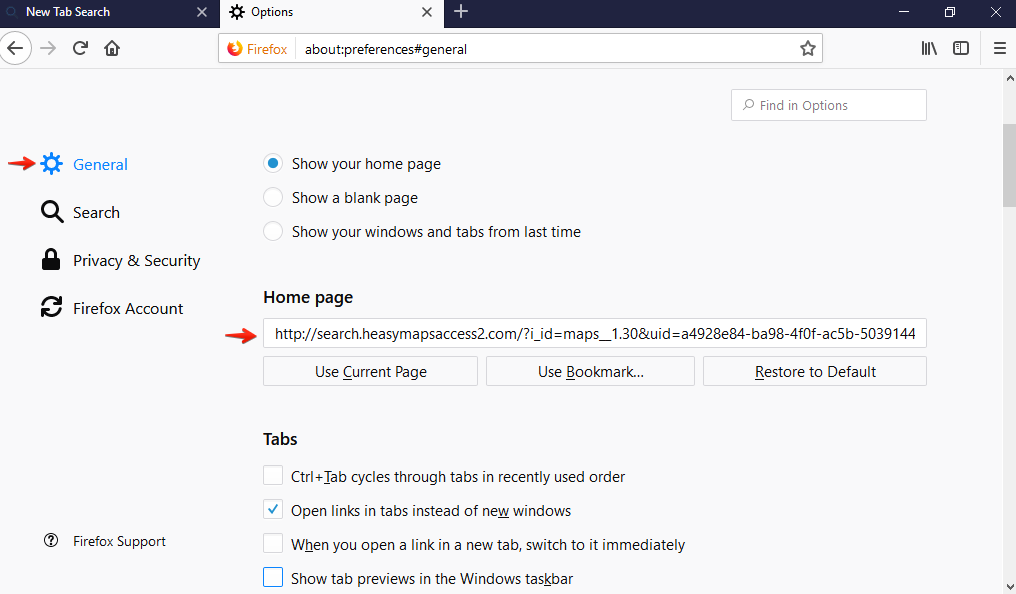 Mozilla Firefox home page settings
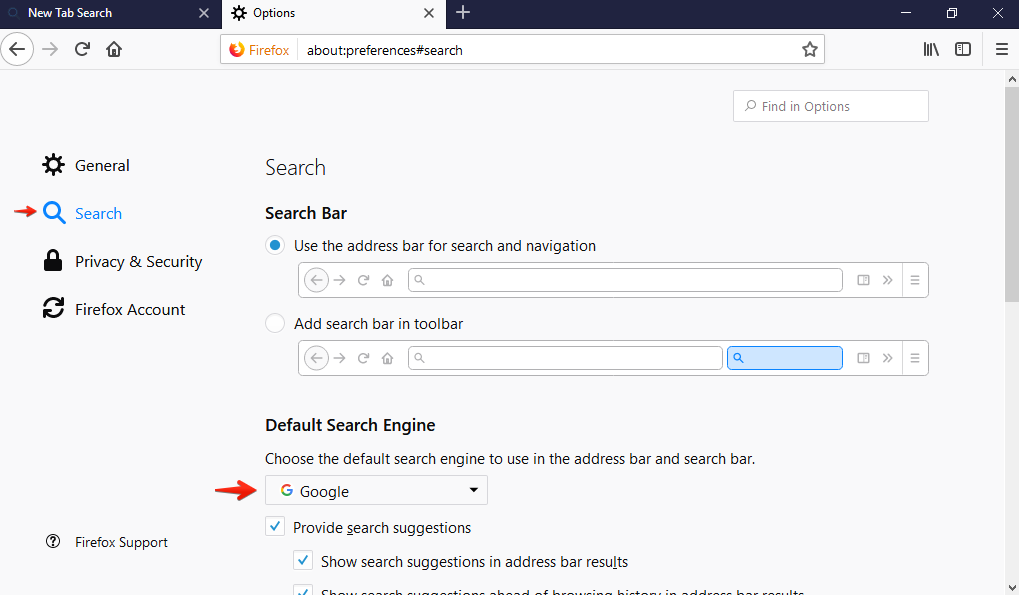 Search engine selection in Mozilla Firefox
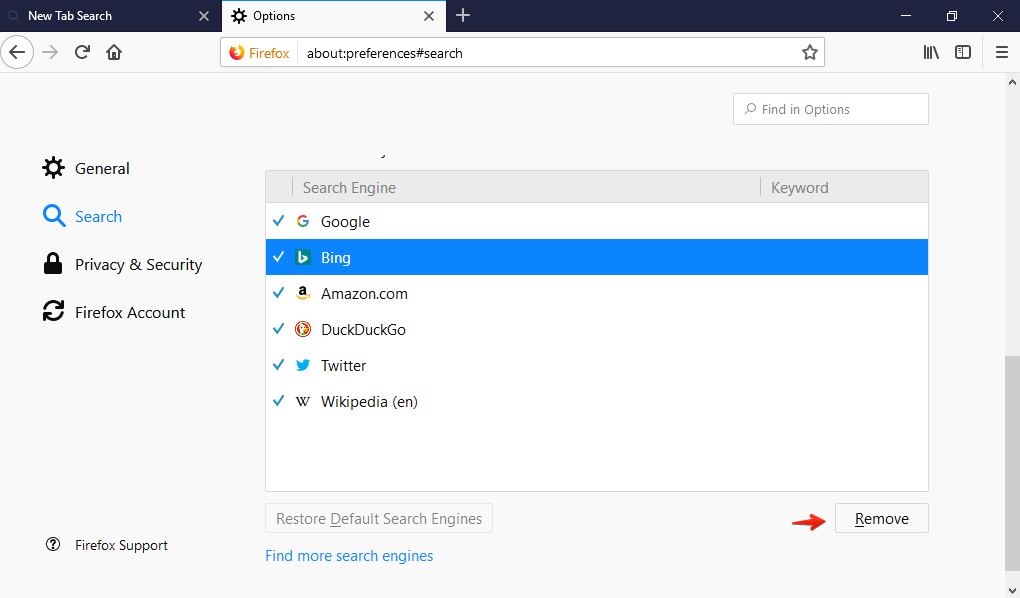 Removing unwanted search engine from Mozilla Firefox
Instructions to repair Internet Explorer home page and search engine settings manually.
- In Internet Explorer, click on its settings menu in the form of a gear-wheel, then select “Internet Options“:
- Click on the “General” tab, then check home page settings. Remove unwanted home page from the field, or click on “Use new tab“. Click on “Apply” to save changes:
- In Internet Explorer, click on its settings menu in the form of a gear-wheel, then select “Manage add-ons“:
- Click on “Search Providers“, then select unwanted search engine and click on “Remove” button related to it:
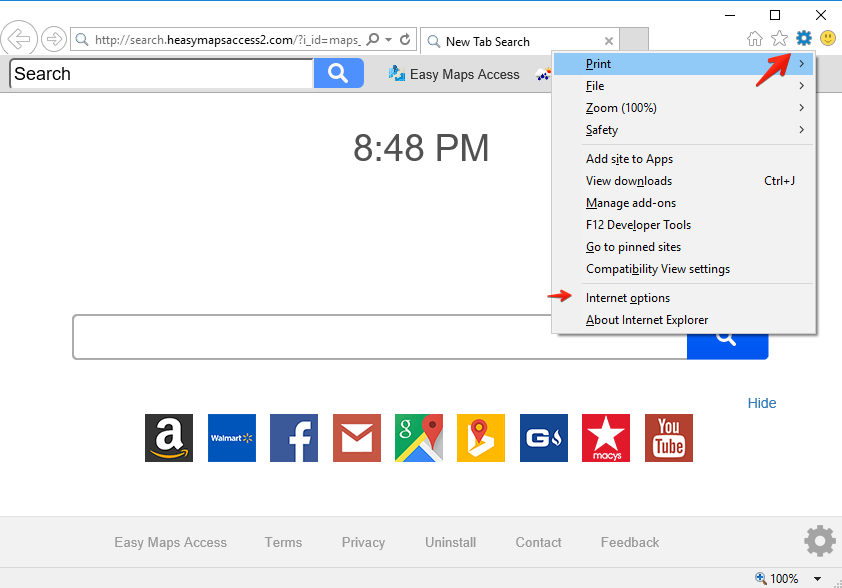 Internet Explorer options
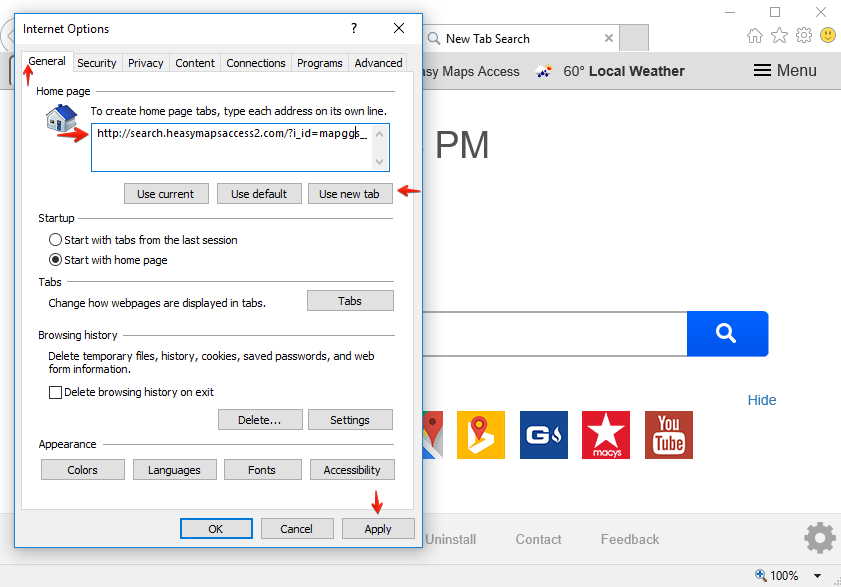 Internet Explorer home page settings
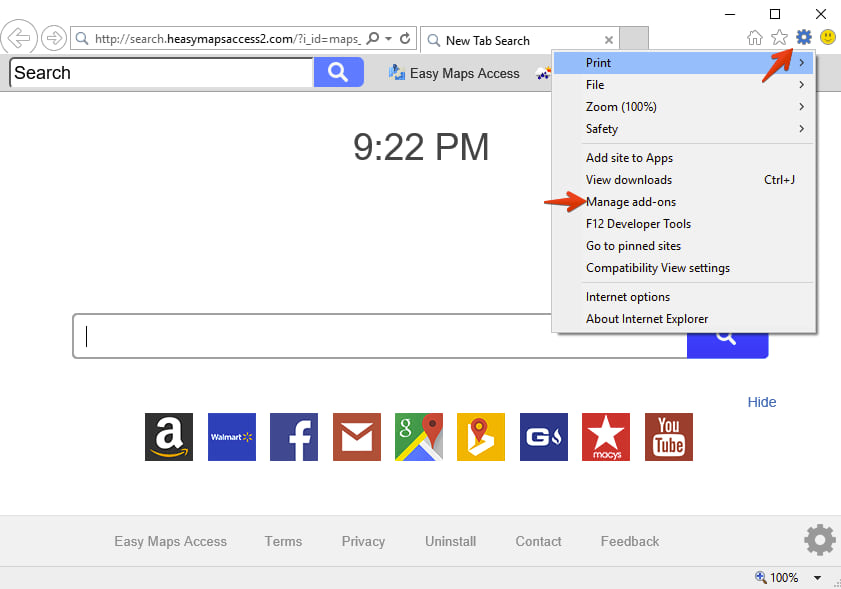 Managing add-ons of Internet Explorer
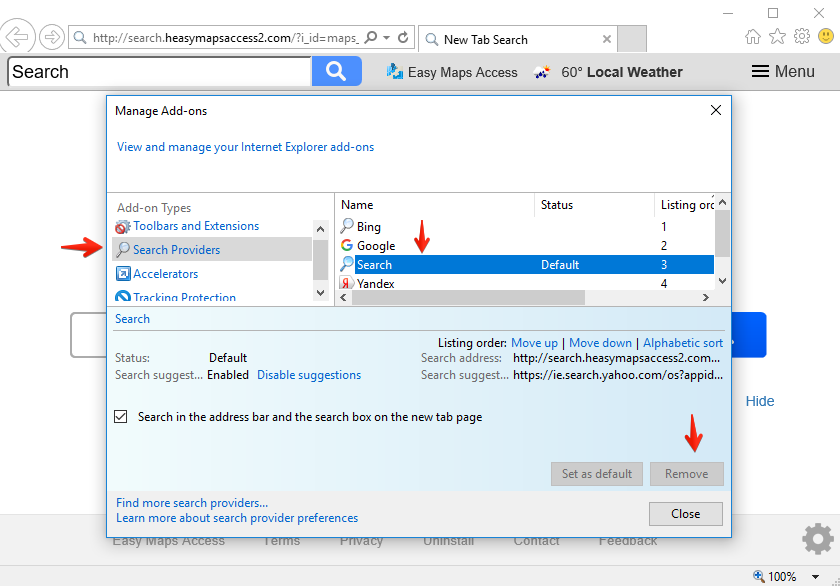 Internet Explorer – Search Providers
Instructions to change Opera home page and search engine settings manually.
- Click on Opera menu in the form of “Opera” button, then select “Settings“:
- Click on “Browser” section, then select “Set pages“:
- Find unwanted start page of Opera, then click on “X” next to it to remove it:
- In the “Search” section, click on “Manage search engines…“:
- Click on “Make default” to select your preferred default search engine, then click on “Done“:
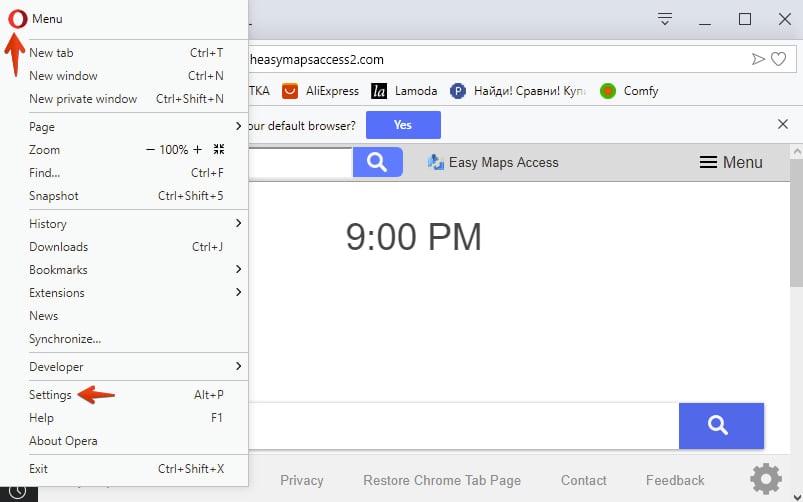 Opera settings
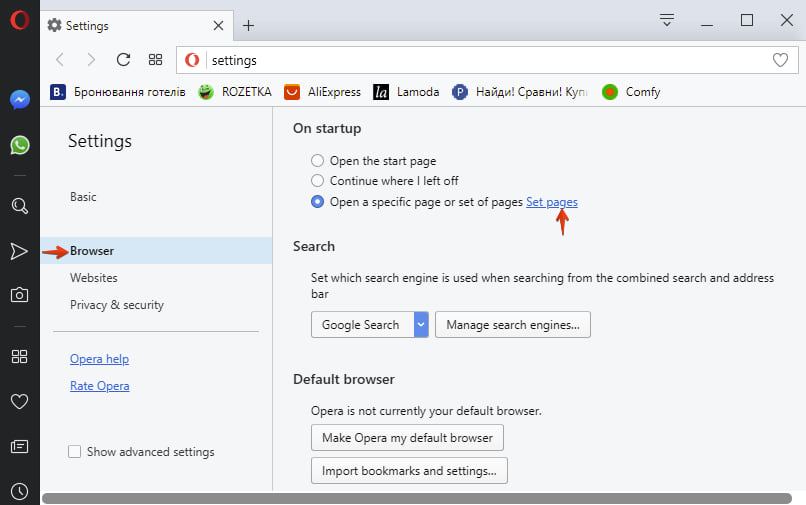 Opera – Set pages
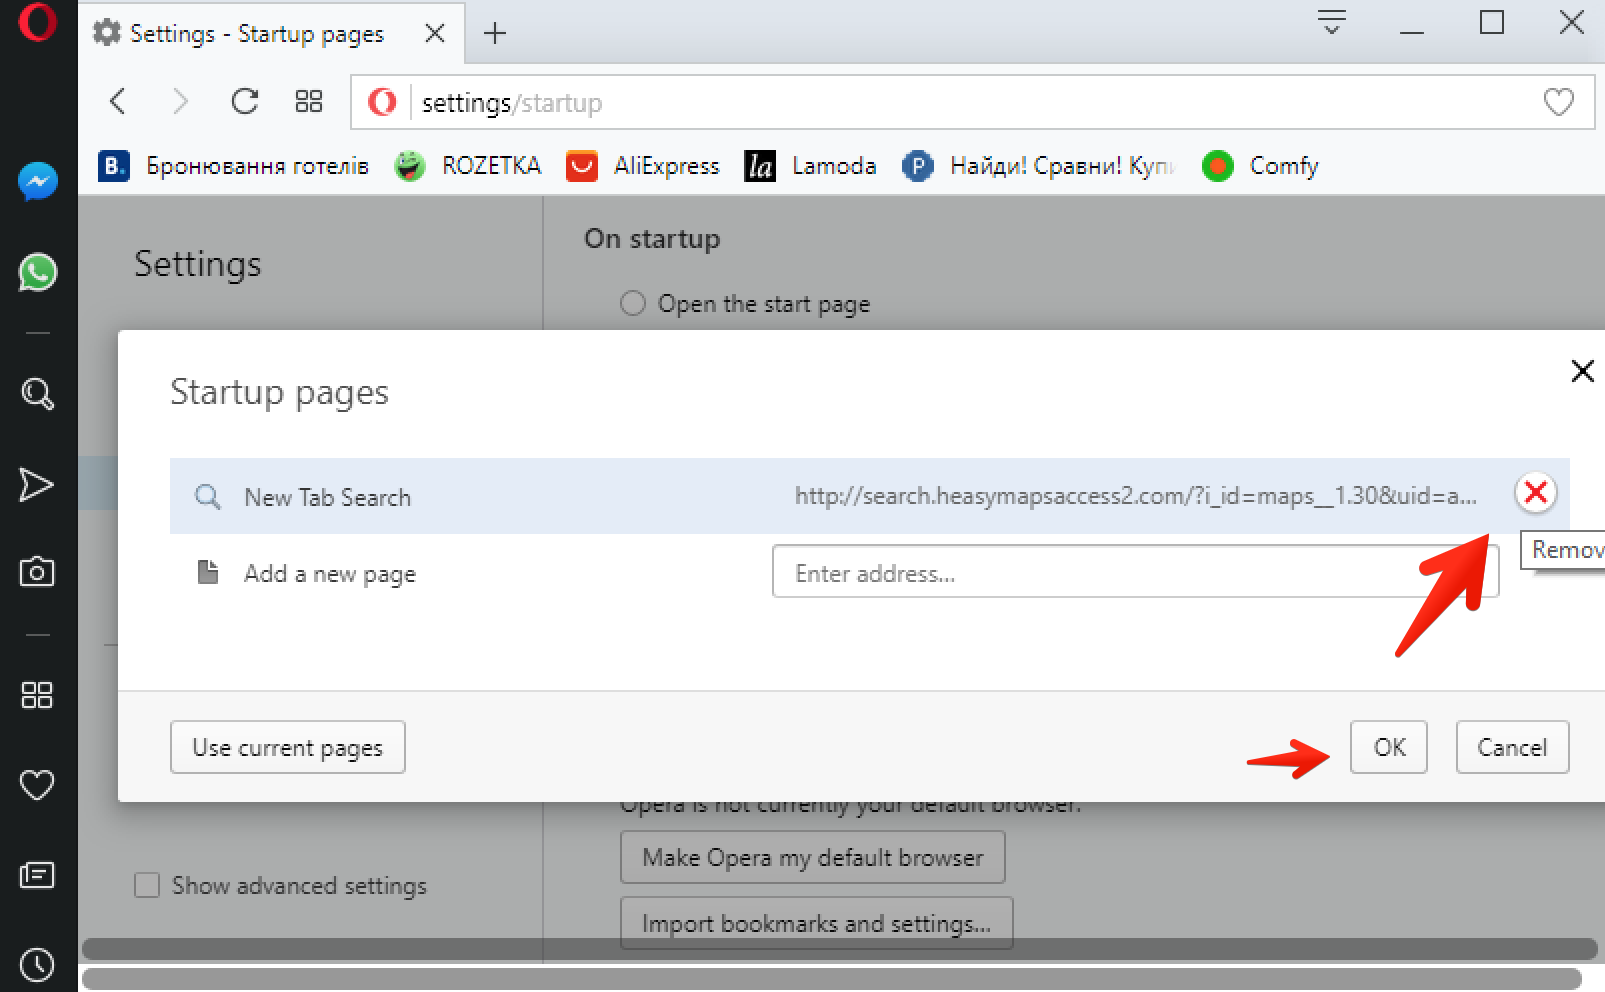 Opera startup pages
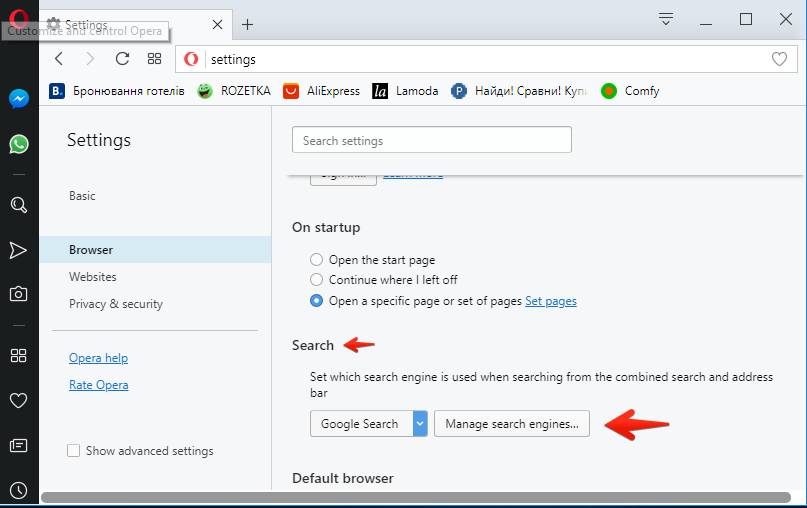 Opera – Manage search engines
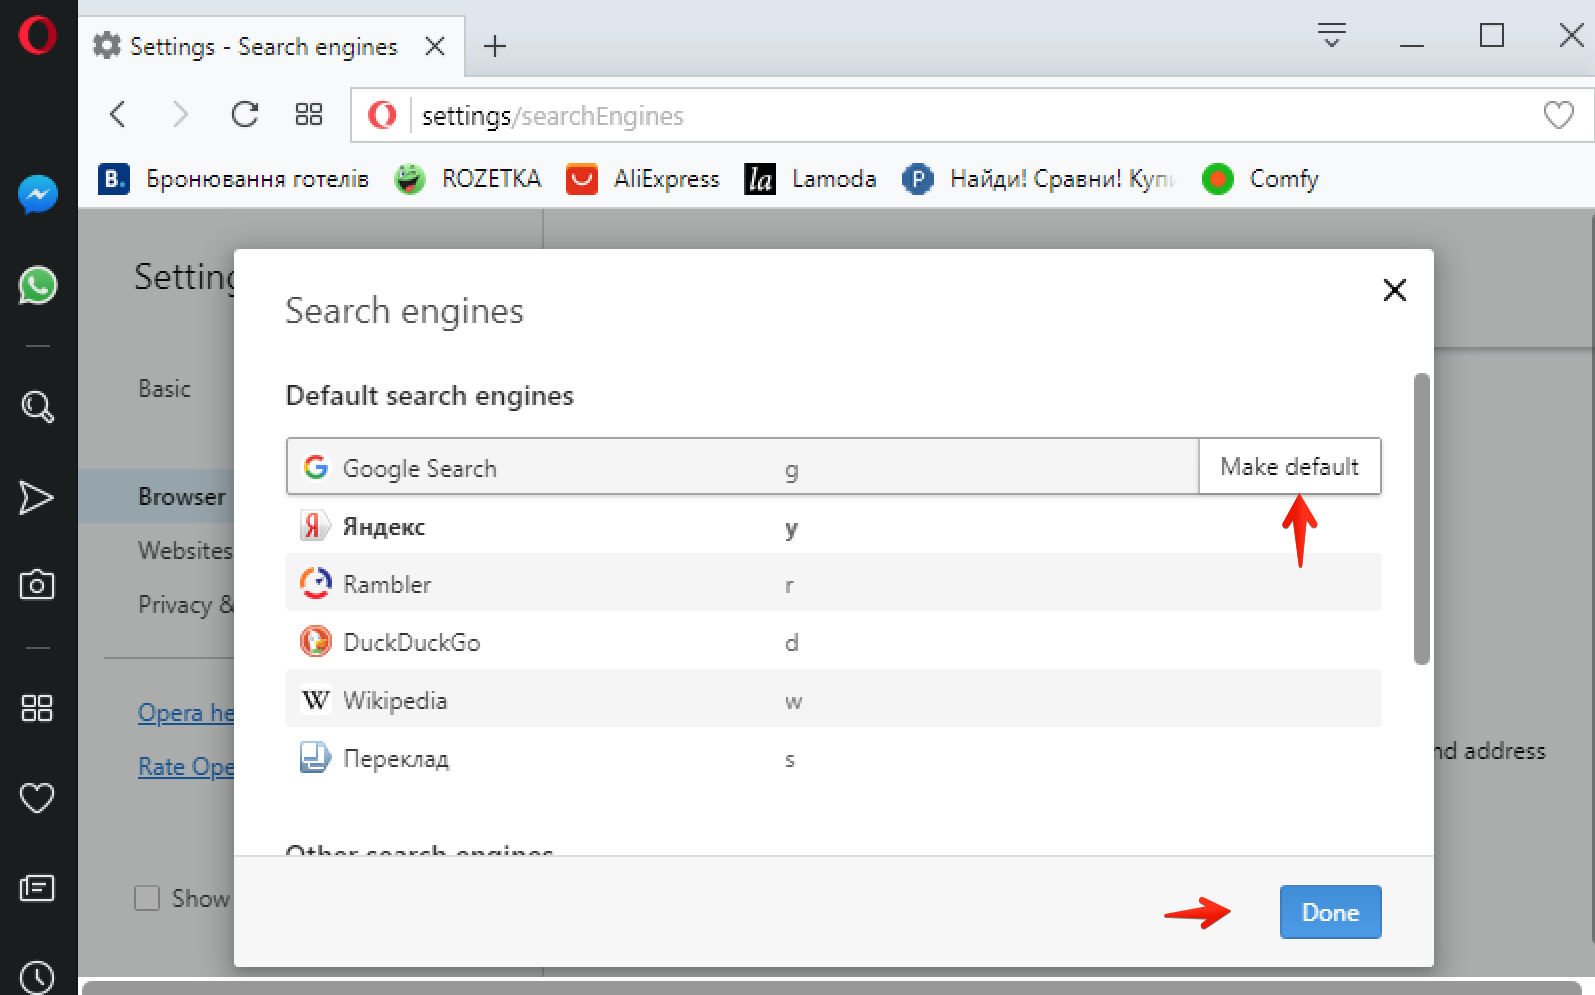 Opera default search selection
STEP 3. Removing unwanted extensions from browsers.
Deleting unwanted extensions from Google Chrome.
- Click on Google Chrome menu in the form of three vertical dots, then select “Settings“:
- Click on “Settings” in the left menu (in the form of three horizontal lines), then select “Extensions“:
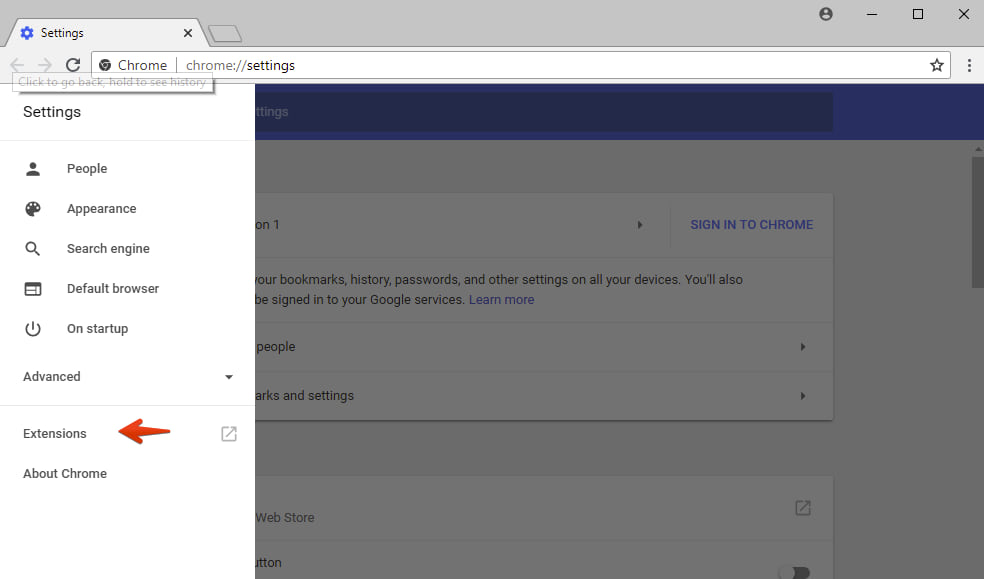 Google Chrome extensions
- Find unwanted extension, then click on “Remove” button next to it:
 Google Chrome Settings
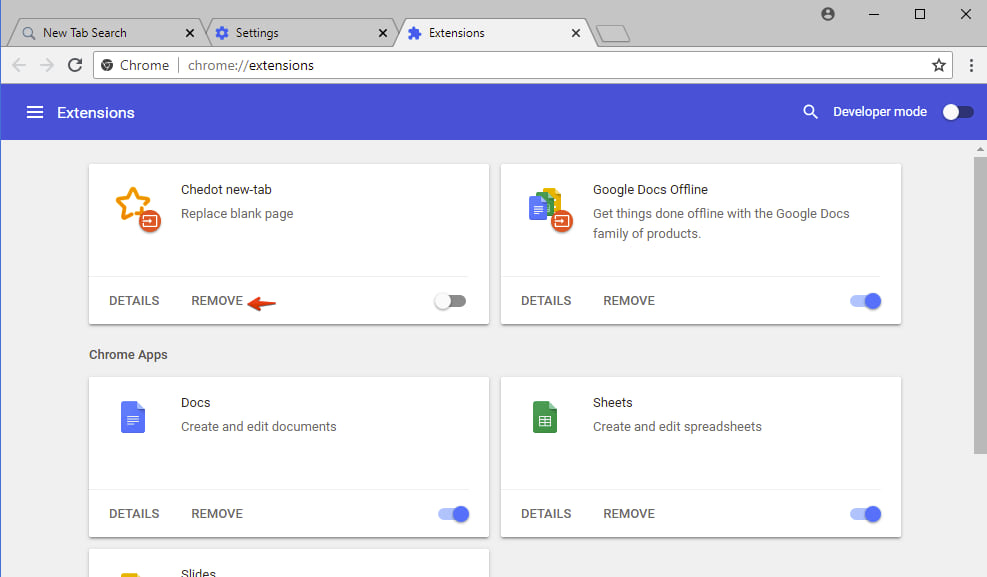 Removing unwanted extension from Google Chrome
Removing unwanted add-ons from Mozilla Firefox.
- In Mozilla Firefox, click on its menu in the form of three horizontal lines, then select “Add-ons“:
- Click on the “Extensions” item. If you see suspicious add-ons, disable and then delete them:
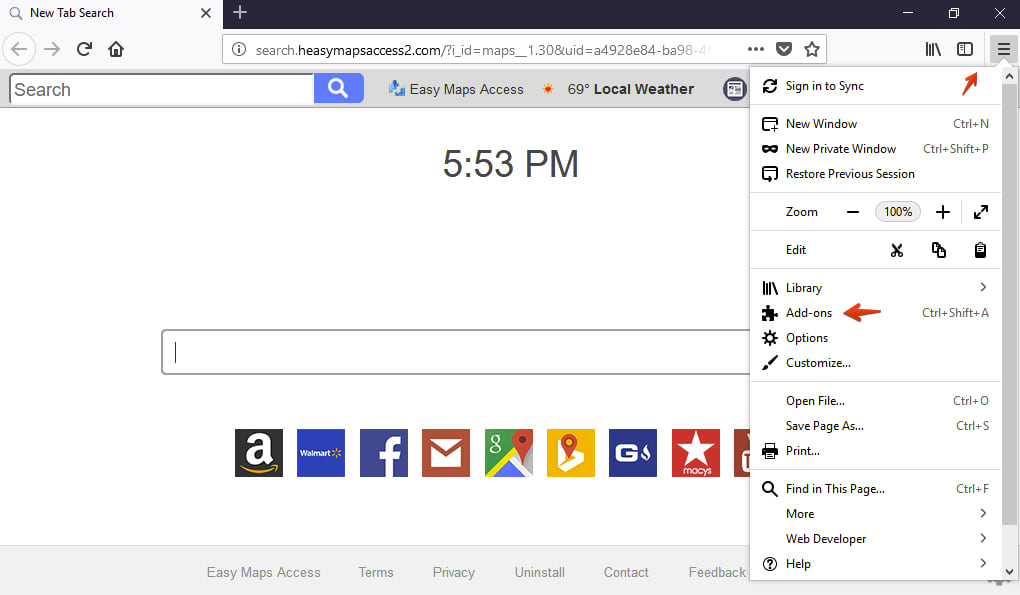 Accessing Mozilla Firefox add-ons
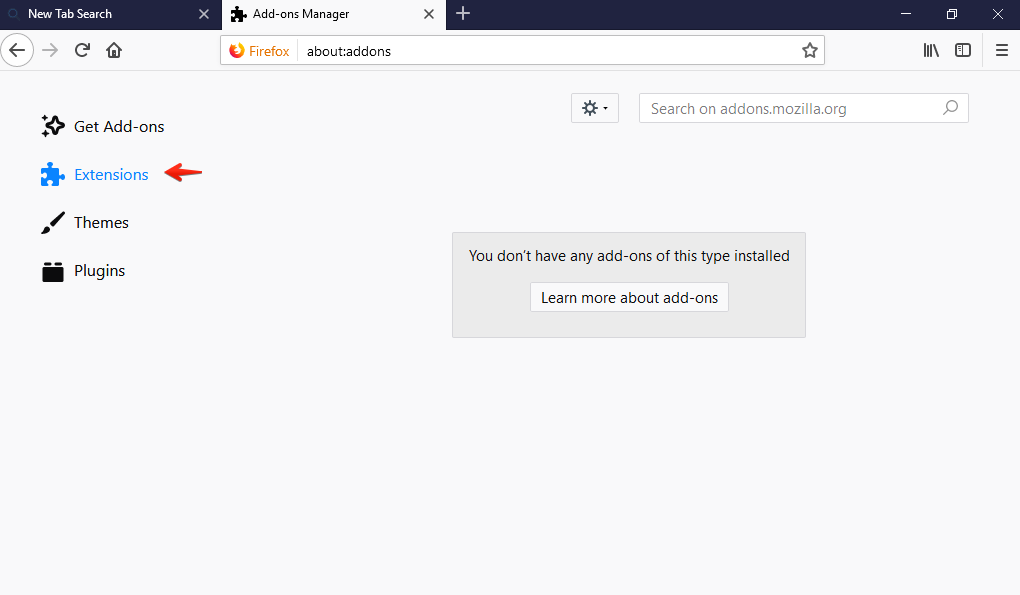 Removing suspicious extensions from Mozilla Firefox
Getting rid of unwanted addons from Internet Explorer.
- In Internet Explorer, click on its settings menu in the form of a gear-wheel, then select “Manage add-ons“:
- In the section called “Toolbars and Extensions“, find specific unwanted add-on, then click on “Disable” button related to it:
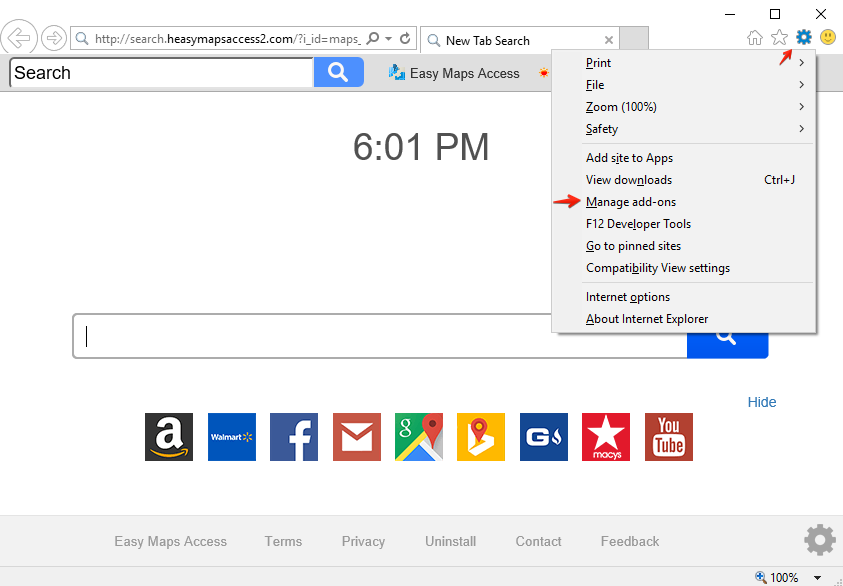 Managing add-ons within Internet Explorer
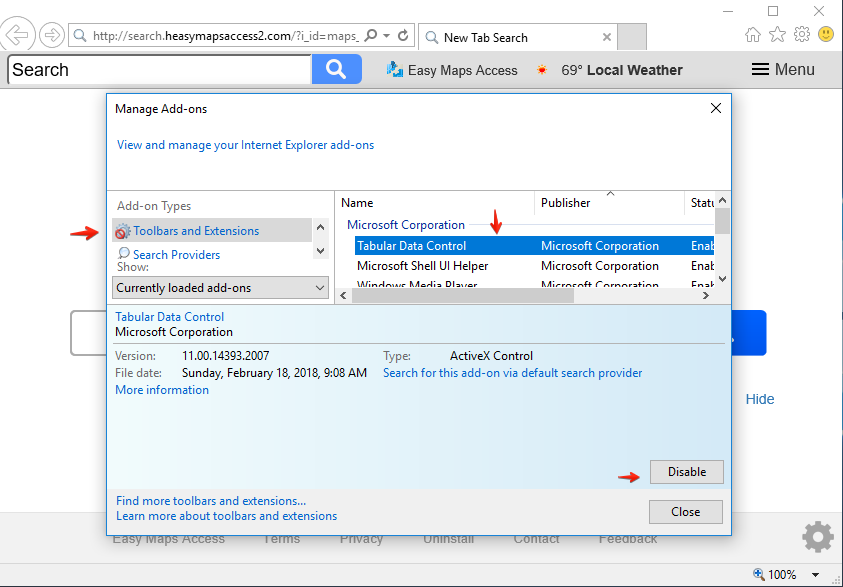 Disabling unwanted add-on in Internet Explorer
Cleaning unwanted extensions from Opera.
- Click on Opera menu in the form of “Opera” button, then select “Extensions“:
- Find specific unwanted extension, then click on “Disable” button associated with it:
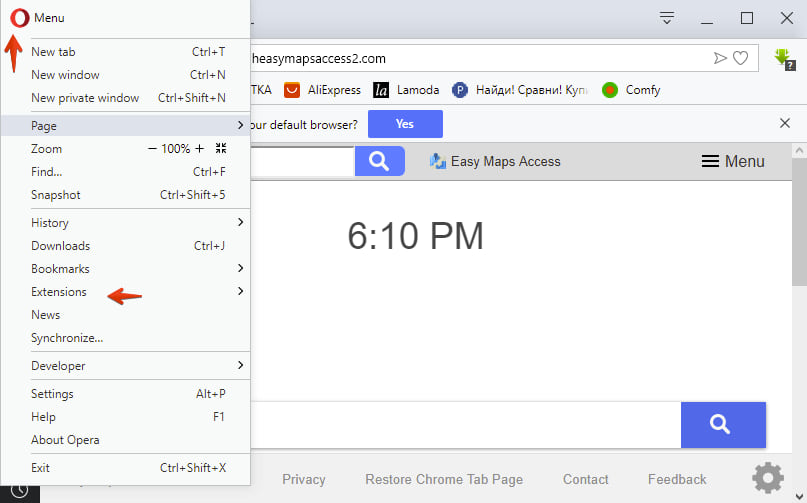 Accessing Opera extensions
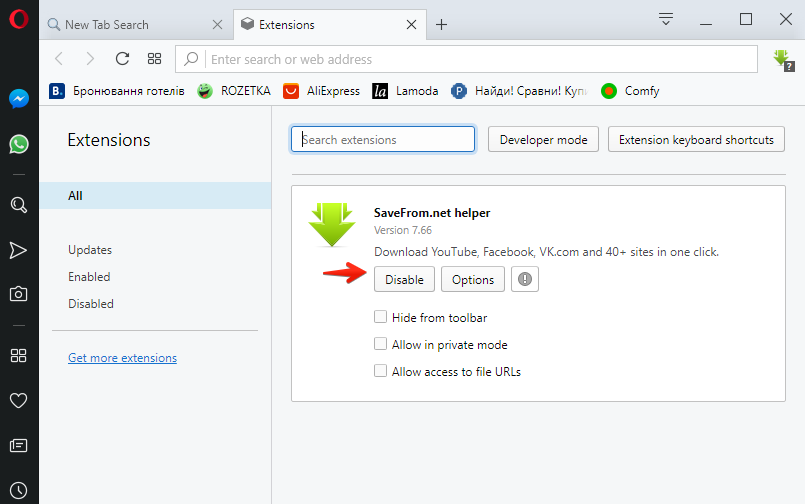 How to disable extensions in Opera
STEP 4. Disabling push notifications from browsers.
Disabling push notifications from Google Chrome.
- Click on Google Chrome menu in the form of three vertical dots, then select “Settings“:
- Scroll down to the bottom of the page, then click on “Advanced“:
- In “Privacy and Security” section, click on “Content Settings“:
- Click on “Notifications“:
- Find specific site that is displaying unwanted push notifications, click on its options in the form of three vertical dots, then click on “Remove“:
 Google Chrome Settings
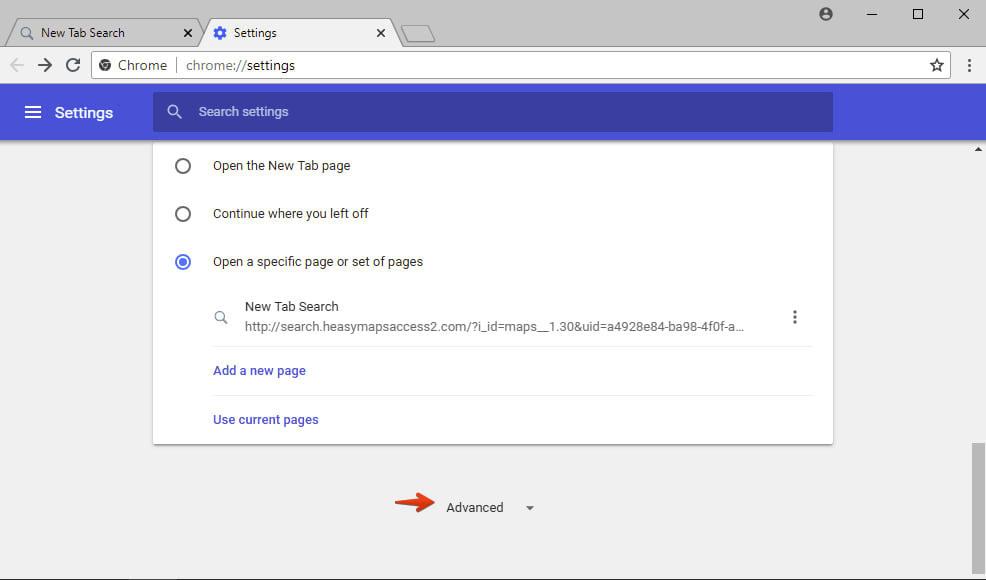 Advanced settings of Google Chrome browser.
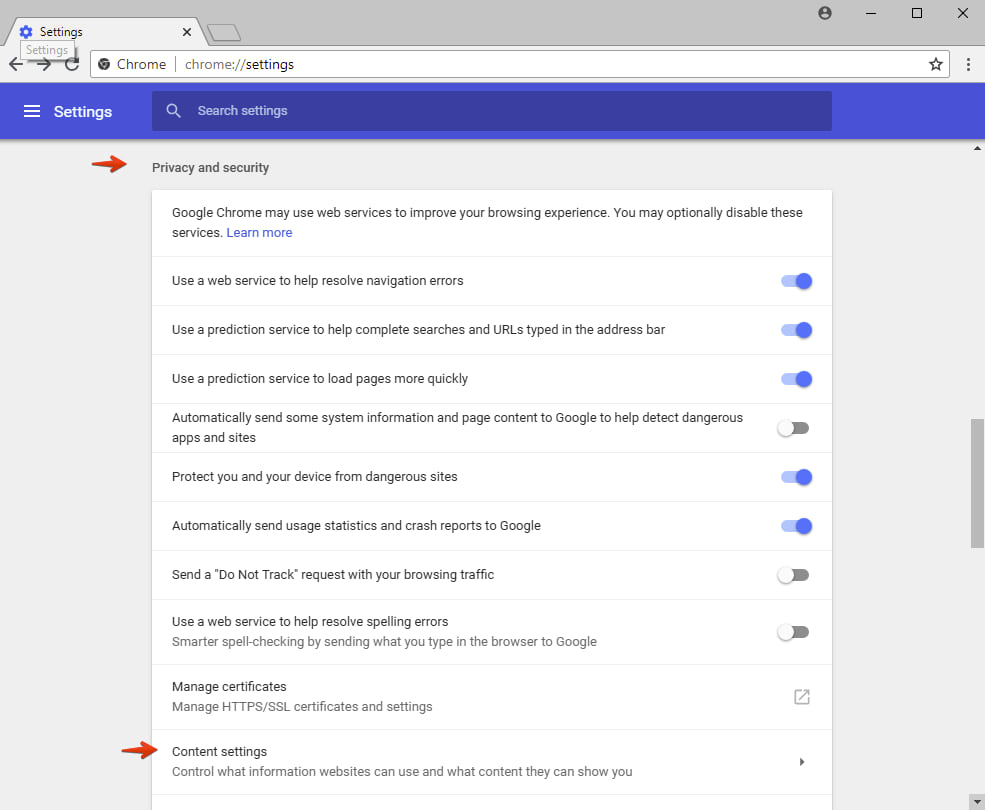 Google Chrome content settings
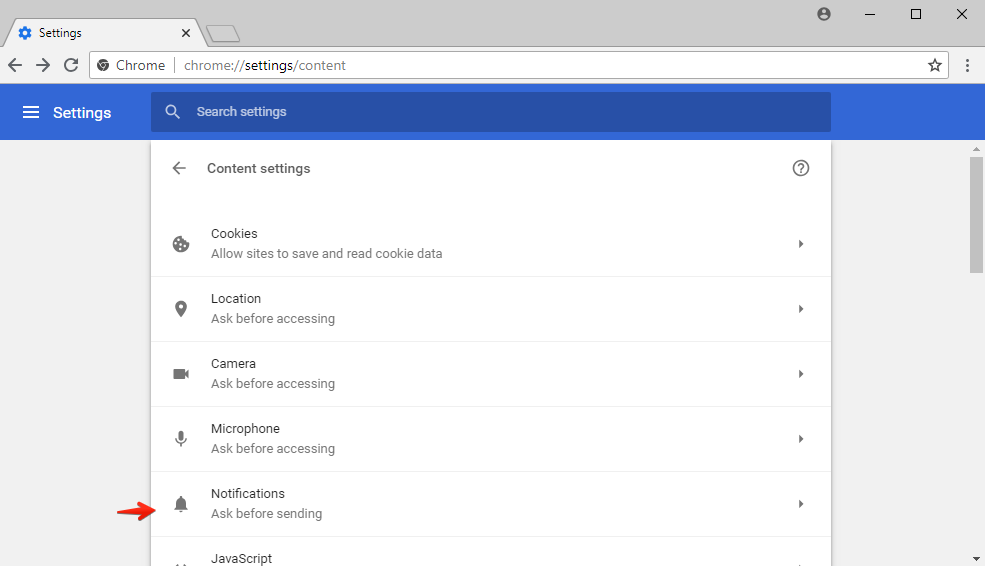 Google Chrome notifications
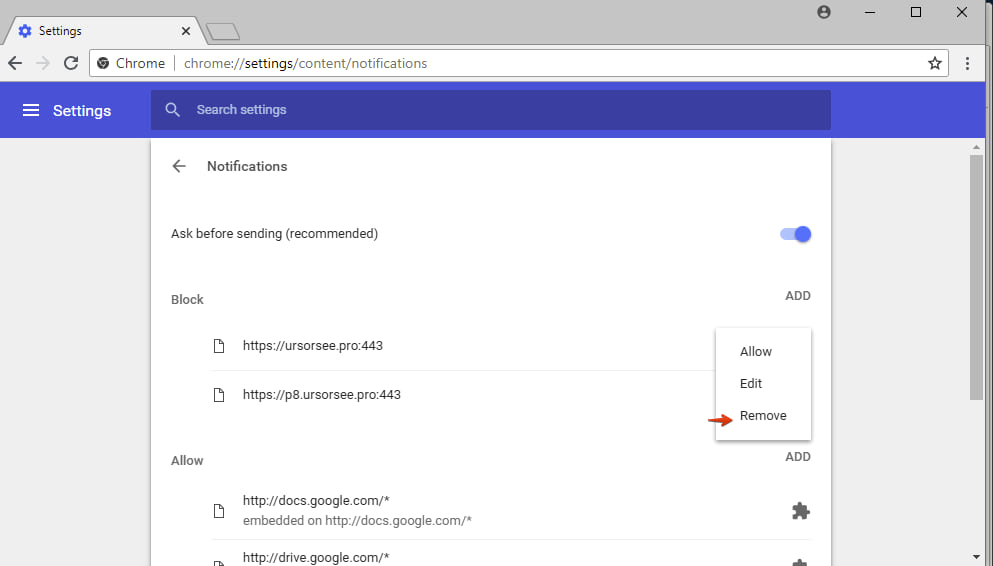 How to remove unwanted push notifications from Google Chrome.
Disabling push notifications from Mozilla Firefox.
- In Mozilla Firefox, click on its menu in the form of three horizontal lines, then select “Options“:
- Scroll down to “Privacy & Security” section, then find “Notifications“, click on “Settings” button related to it:
- Find unwanted sites that keep displaying unwanted notifications, then change the status from “Allow” to “Block“. Additionally, check the box “Block new requests asking to allow notifications“. Then click on “Save changes“:
 Mozilla Firefox options
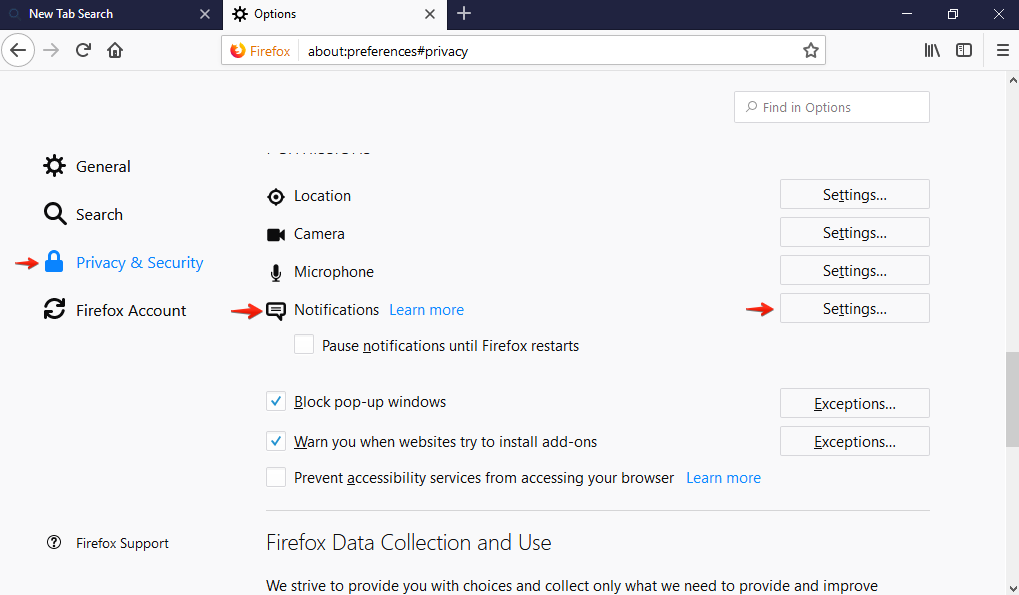 Mozilla Firefox notifications
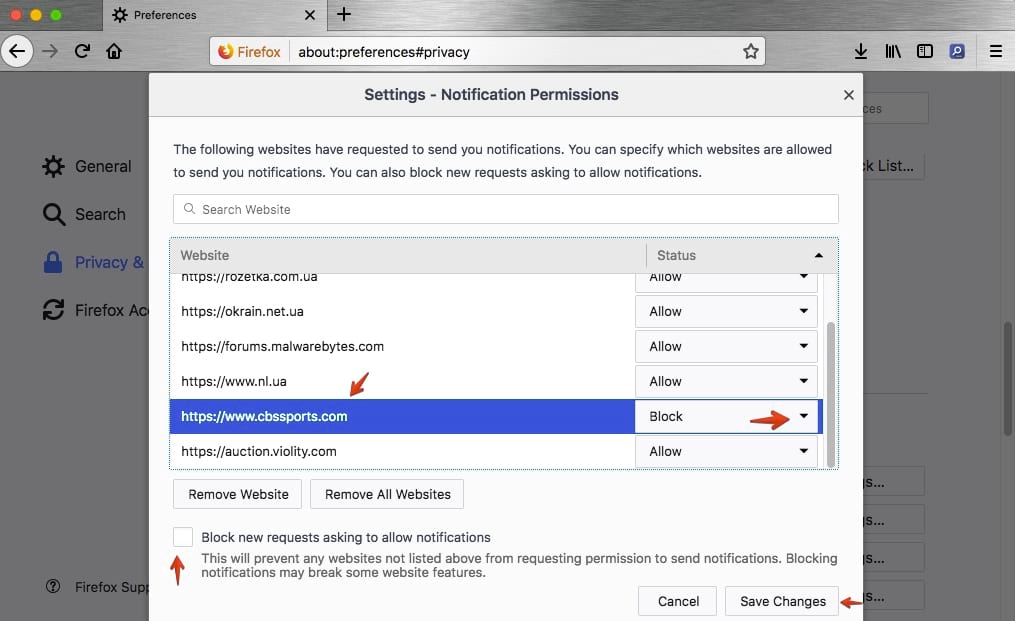 How to block unwanted notifications in Mozilla Firefox
STEP 5. Full reset of browsers either manually or automatically (video guides).
Important notice! Trying to fix your browsers manually after malware attack is definitely not easy, requires more skills and time, even with detailed description as above. We recommend you to try our absolutely free feature provided by GridinSoft Anti-Malware to reset your browsers automatically within just a couple of mouse clicks!

